Over the past 2 years there has been a growing number of initiatives to address data management issues in scientific research. While this is no news in some fields like genetics, where input data as well as derived data (results) are shared in standardised digital formats, in other fields researchers have been mainly left alone to develop their own data structure and data management plan, i.e. “reinventing the wheel” multiple times. In Finland, the last round of Academy of Finland application was – for the first time – explicitly asking for a data management plan (DMP). To help the applicants, web tools such as https://www.dmptuuli.fi/ were developed to specifically follow Academy of Finland guidelines as well as other DMP templates such as ERC’s Horizon 2020, NIH, Wellcome Trust. DMPtuuli is based on https://dmponline.dcc.ac.uk/ delivered by http://www.dcc.ac.uk/. Another important resource in Europe is the EUDAT platform https://www.eudat.eu/ that goes beyond DMP, to also include data sharing, data preservation, data processing, meta-data indexing. For those more interested in the hot topic of data management in academia (or other data initiatives), I recommend following my dedicated Twitter list about data.
TL;DR summary of the post
- Use GIT for each project
- Physical storage separation between
- source data
- code/text
- scratch data
Let’s get to work!
Management plans are important, but when plans translate into doing the actual work, it is clear that data management is highly intertwined with project management. Although project management is another monster by itself (ps: I cannot recommend enough Basecamp, the best project and intranet communication management tool for small companies and small labs), in scientific research data and project management are fusing together when it is about to start planning how to actually store your raw data, derived data, figures, manuscripts, etc and share the workload with other collaborators or (for PIs) monitor the work of your lab members.
I often notice tweets on the topic of project+data management (here a recent one that comes to my mind) and, so far, there is no optimal agreed way to organize folder structure for scientific projects. Clearly, raw data have similar issues and, specifically to neuroscience, data formats like BIDS are finally solving the issue on how to structure raw data in a standardised format to facilitate data sharing and pipelined data processing. Similarly for results, a new format called NIDM (NeuroImaging Data Model) aims at providing a structured machine-readable description of neuroimaging statistical results.
Everyone agrees however that a project should live in a single folder, and this is the approach of packages like cookiecutter https://github.com/audreyr/cookiecutter. With cookiecutter you can create a standardised directory tree to store relevant parts of your project. Interesting cookiecutter templates for data scientists are https://github.com/drivendata/cookiecutter-data-science and https://github.com/mkrapp/cookiecutter-reproducible-science (figure below is the folder tree strucutre for coockiecutter-data-science).
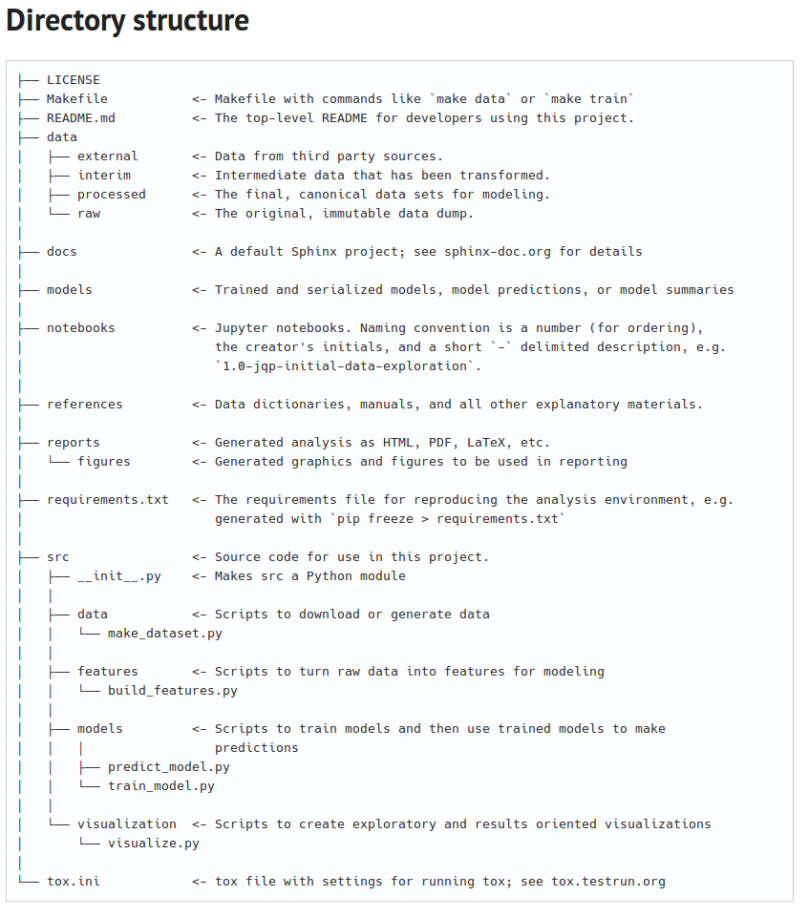
Tree folder structure from https://drivendata.github.io/cookiecutter-data-science/
Similarly, the project folder structure by Nikola Vukovic gained some popularity http://nikola.me/folder_structure.html (contains script for automatically creating the folder structure, see figure below).
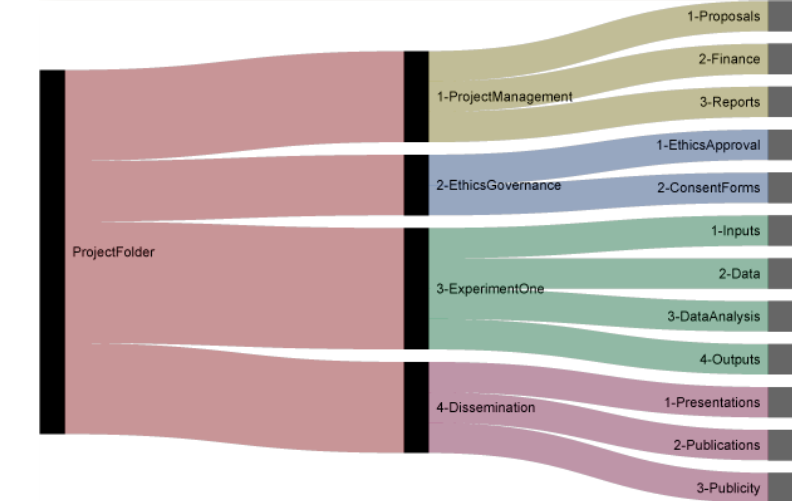
Figure from http://nikola.me/folder_structure.html
Richard Darst at Aalto university computer science dept. has suggested a simple guideline for project folder management; a folder structure like:
- PROJECT/code/ – backed up and tracked in a version control system.
- PROJECT/original/ – original and irreplaceable data. Backed up at the same time it is placed here.
- PROJECT/scratch/ – bulk data, can be regenerated from code+original
- PROJECT/doc/ – final outputs, which should be kept for a very long term.
- PROJECT/doc/paper1/
- PROJECT/doc/paper2/
- PROJECT/doc/opendata/
and variations for individual sub-projects within a project:
- PROJECT/USER1/…. – each user directory has their own code/, scratch/, and doc/ directories. Code is synced via the version control system. People use the original data straight from the shared folder in the project.
- PROJECT/USER2/….
- PROJECT/original/ – this is the original data.
- PROJECT/scratch/ – shared intermediate files, if they are stable enough to be shared.
(for Aalto users, more details in the wiki page https://wiki.aalto.fi/display/Triton/Data+management).
The crunch: what should I do for project+data management?
Q: I am a new PI and I am starting a new lab, which folder structure should I use?
I personally like the barebone approach proposed by Aalto’s computer scientists which aims at keeping the folder structure as simple as possible, yet standardised across projects so that a new person joining an existing project already knows where the relevant bits are stored. Specifically, at Aalto Science there are three types of storage systems:
- /archive/ – long term preservation, backed-up periodically, as much disk space as it is needed
- /project/ – backed up daily, ideals for storing smaller files related to a project, limited disk space
- /scratch/ – not backed up, derived data related to a project, “infinite” disk space
For those who are not at Aalto University, a similar system at home would be:
- Archive folder is an external hard disk, backed up twice, with only raw data
- Project folder is a directory under your local Google Drive or Dropbox folder for automatic back up of (smallish) files
- Scratch folder is a huge external disk (e.g. 1TB) of derived data, no back-up but easy to recreate by running code from project folder.
The project+data management procedure I am using goes as following:
1) start a git repository
Go to github or version.aalto.fi and start a repository with a meaningful project name that we will call myprojectnickname. Make sure that the same name has not been used in the shared project folder (in our group, folder /m/nbe/project/braindata/, in your home computer /Users/username/Google\ Drive/project/). Git is scary for some people (check my 10 minutes introduction to GIT), but what I require my colleagues to AT LEAST do is to just create an empty repository with just a single file called README.md. They can edit it via github web interface for example. README.md is the barebone digital brother of the “lab notebook” so that anyone joining the project immediately gets an idea what is this project is about and other important notes (where the data are, what has been done so far, a to-do list of next steps).
2) go to the main project storage system and clone the newly created git repository
From the command line in Linux or Mac
cd /m/nbe/project/braindata/
git clone
This will make sure that your code and other relevant documents are backed up daily (so that even if you do not want to use GIT, you still get your files and code backed up).
3) Create subfolder code
Here goes all the code that is needed. This means that everything you do is done with scripts. If you use graphical interfaces (e.g. to create pictures) you should write down the steps.
Side note: always use simple text files!
Use simple text file when possible and avoid using MS-Word or Open Office for writing notes about your project and your data. Similarly CSV or TSV are better than Excel files. The reason is that in 10 or 20 years those file formats might not be easily readable while text files will always stay with future us. The so called markdown format (as used in README.md) is a good example of simple text file with a bit of formatting explicitly written in the file. See a markdown quick introduction here: https://guides.github.com/features/mastering-markdown/
4) Create subfolder original
For the original data, what you actually do is a link to a folder on /archive/ the long term back up disk system.
cd /m/nbe/project/braindata/myprojectnickname/
ln -s /m/nbe/archive/braindata/myprojectnickname/ original
Side note for those using Google Drive or Dropbox
Google drive ignores links to folders and does not back up them (which is good in our case since they contain huge files). Dropbox however also backups links, so you need to explicitly tell Dropbox to not synchronise your “big data” folders.
Now the subfolder orginal is not a real subfolder but just a link to a subfolder in the archive file system. Note: before running the above, make sure the subfolder on archive exists.
5) Create subfolder scratch
Similarly, the subfolder for scratch is just a link to a real folder under the scratch filesystem
mkdir /m/nbe/scratch/braindata/myprojectnickname/
cd /m/nbe/project/braindata/myprojectnickname/
ln -s /m/nbe/scratch/braindata/myprojectnickname/ scratch
6) That’s it. You have the bare minimum needed for starting the project!
Reward yourself with a cookie.
I think it is then up to the user or research group to go as deep as they want to define standards for the subfolder structures. A PI with many lab members will want to make sure that also other aspects of the projects folder structure are standardised (results, figures, etc etc, see the cookiecutter figure above) so that it is easier to check the status of a project without asking the project owner where file X is (and please remember that the README.md file should explain the subfolder structure for the project for exactly these special cases).
What if I want to just play with data and don’t have a project?
In our group I have also thought about those cases where a user just needs a sandbox to play with data without having a clear project. For this, each user can create a folder:
mkdir /m/nbe/project/braindata/shared/username
and then what is under there is just up to the user (as long as disk space is not big, e.g. only few gigas). Similarly for “infinite” disk space sandbox:
mkdir /m/nbe/scratch/braindata/shared/username/
When sharing a file system with many others, the shared folder is useful to share resources that everybody uses. So for this case we have a folder
/m/nbe/scratch/braindata/shared/toolboxes/
where all the external tools (SPM, FSL, Freesurfer, etc) are stored and kept up to date (i.e. a single user does not have to re-download a toolbox that is already present in the system).
Conclusions
I think this blog entry is just a starting point and I believe I will edit this in the future with useful comments from colleagues and internet people. At this stage the procedure I described is manual, which is fine for a small lab (always remember https://xkcd.com/1205/), but young PIs might want to seriously consider using cookiecutter with cookiecutter-data-science template from day zero to automate the creation of multiple subfolders [ps: there is even one template for fMRI or more in general neuroscience projects https://github.com/fatmai/cookiecutter-fmri].
